Key Takeaways
- A collapsed brake hose and a seized caliper have identical symptoms — the bleeder screw test is the only way to separate them
- Replacing the caliper when the hose is the problem means the new caliper will seize again within days
- The spin test and hot rim test tell you which corner — the bleeder test tells you which part
- You need a floor jack, jack stand, and an 8–10mm wrench — nothing else
- Always bleed the system after repair — opening the bleeder screw lets air into the line
Why These Two Fail Differently — But Feel the Same
Before the tests, here's the key thing to understand. These two components fail in completely different ways, but they produce the same result: a brake that stays on after you lift your foot off the pedal.
A bad caliper: The piston inside is seized. Corrosion, worn seals, or a bent piston means it physically won't retract when you release the brake. The pad stays pressed against the rotor constantly. The fix is replacing the caliper.
A collapsed brake hose: The rubber hose between the metal brake line and the caliper has deteriorated internally. The inner lining peels and acts like a flap — fluid can push through toward the caliper when you press the pedal, but it can't flow back when you release. The caliper stays pressurized. The caliper itself is fine. The fix is replacing the hose.
The symptoms are identical: hot wheel after driving, car pulling to one side, dragging, and burning smell from one corner. You cannot tell them apart by symptoms alone.
What you need
Floor jack + jack stand, 8mm or 10mm open-end wrench, work gloves, shop rags for brake fluid. That's it.
Drive normally for 5–10 minutes at city speeds, then park immediately. Put on gloves. Go to each wheel and hover your palm about 2 inches from the rim — don't touch it, it can be extremely hot. You're looking for which rim radiates more heat than the other three.
A rim that is noticeably hotter than the rest tells you exactly which corner has the dragging brake. All your remaining tests get focused on that wheel.
Jack up the suspect wheel and secure it on a jack stand. Car in neutral, parking brake off. Grab the tire at 9 and 3 o'clock and try spinning it.
A healthy wheel with no drag will spin with moderate resistance — you'll hear the pads lightly scraping the rotor. A wheel that won't spin, locks up immediately, or feels like it's dragging through mud has a brake that is not releasing.
For a clearer comparison: jack up the opposite side and spin that wheel too. The difference between a healthy corner and a dragging corner is obvious back to back.
With the wheel jacked up, look through the spokes at the brake caliper. You can usually see the outer brake pad sitting in the caliper bracket. Now do the same on the opposite side.
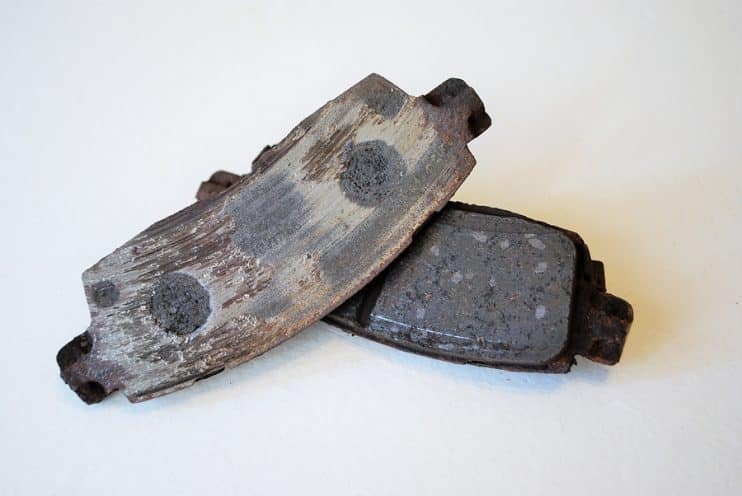
A dragging brake burns through pads on that corner much faster. If one side's pads are dramatically thinner — or down to bare metal — while the opposite side still has material left, that confirms the dragging corner and tells you it's been going on for a while.
Also check for scoring or grooves on the rotor surface through the spokes. Deep grooves mean the pad is gone and the rotor is being damaged with every stop — that corner will need pads and a new rotor regardless of whether it's the caliper or the hose.
This is the one. Everything else tells you which corner. This test tells you which part.
Wheel is jacked up and confirmed dragging. Have a rag ready to catch brake fluid. Find the bleeder screw on the caliper — it's a small nipple-shaped valve, usually on the back or top of the caliper body.
Using an 8mm or 10mm wrench, crack the bleeder screw open about a half turn. Fluid will start weeping out. Watch the wheel.
Always bleed after the repair
Cracking the bleeder open lets air into the brake line. A system with air in it means a soft pedal. Bleed that corner completely after replacing the hose or caliper — don't skip it.
Find the flexible rubber brake hose — the section that runs from the hard metal brake line (bolted to the body or frame) down to the caliper. Usually 10–15 inches long.
Look for: bulging or swelling anywhere along its length, surface cracking, soft spots, or sections that look darker or more worn than the rest. Run your fingers along the full length and squeeze it — a healthy hose feels firm and consistent. A hose with a soft or squishy section has deteriorated internally.
Important limitation: A collapsed brake hose can look completely fine on the outside. The inner rubber liner can peel and fail without any visible exterior damage. This is why Test 4 is the real answer. Test 5 catches obvious external damage, but a clean exterior does not rule out a bad hose.
After You Know the Answer — What Gets Replaced
Caliper is seized — replace the caliper
New caliper, new brake pads on that axle, and bleed the system. If the pads are heavily worn or the rotor is scored, plan for those too. A seized caliper that's been dragging for a while almost always needs a rotor replacement on that corner.
Caliper replacement: $150–$350 depending on vehicleHose is collapsed — replace the hose
New rubber brake hose on that corner, then bleed the system. The caliper itself is usually fine. If the pads or rotor were damaged from the drag, those get replaced too — but the caliper stays.
Hose replacement: $80–$180 — significantly less than a caliperThis is why the bleeder test matters. Replacing the caliper when the hose is the problem means the new caliper will seize again within days — same trapped pressure, same result. Mechanics who skip the bleeder test end up doing the job twice.
Frequently Asked Questions
Not sure which one it is? Call (605) 376-2130 and tell us what you're seeing — we'll help you figure it out before you buy parts.
Need a caliper or hose replaced?
We come to your home or office. Same-day appointments available.
Get Free Quote (605) 376-2130